In the vast, blocky sandbox universe of Minecraft, players have consistently faced challenges when trying to incorporate organic, round shapes into their builds. The grid-based nature of the game means every structure is blocky by default. So, when the desire arises to create a circular or spherical structure, many players find themselves at a loss. This is where the Minecraft Circle Chart comes into play.
What is Minecraft Circle Chart?
A minecraft circle guide is blueprint used by players to create circles or spherical shapes in the game. It’s a visual representation showing the sequence and number of blocks required to mimic a circle within the constraints of Minecraft’s blocky world.
- Nature of the Chart: Most of these charts focus on one quadrant of a circle. This is because, in the case of circles, the pattern is symmetrical across all four quadrants. If you can build one quadrant, you can replicate it three times to complete the circle.
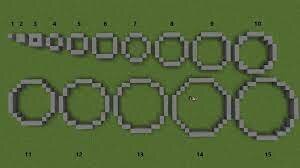
- Versatility: The circle chart isn’t limited to just small circles. It usually provides guidelines for a wide range of diameters, enabling players to build anything from tiny round platforms to massive circular arenas.
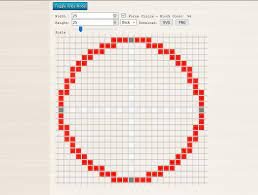
How to Generate Pixel Circles in Minecraft?
Creating pixel circles or pixel art in Minecraft is all about plotting the right number of blocks in the right sequence. Here’s a step-by-step breakdown on how to generate pixel circles using a circle chart:
a.Choose the Diameter: Before starting, you must decide on the diameter of the circle you want. This is the distance across the widest part of the circle.
b.Refer to the Circle Chart: Once you’ve chosen the diameter, refer to the circle chart for that specific size. The chart will provide a sequence of block placements.
c.Plotting the First Quadrant:
- Start by finding a base point. This will be the starting point of your circle.
- Begin placing blocks according to the chart. For instance, if the chart starts with “3 blocks,” you’d place three blocks in a straight line.
- Move to the next row and follow the chart’s next instruction. Continue this until the quadrant is complete.
d.Replicating Across Quadrants: Since circles are symmetrical, once you’ve completed one quadrant, you can replicate that pattern in the three remaining quadrants. Rotate around your starting point, ensuring that you’re mirroring the pattern correctly.
e.Adjustments: Once your circle is complete, step back and review. Sometimes, minor adjustments may be required based on the surrounding environment or your personal preferences.
f.Going 3D: For players looking to create spheres instead of circles, the process is a bit more complex. However, there are sphere generation charts and online tools available to help visualize and plan these structures. If you’re new to designing round edifices in the game, consulting the Circle Chart can make the process much more intuitive.
How To Use A Minecraft Circle Guide
Chart provides a visual guide for creating circles of varying sizes. It simplifies the process by breaking down the complex curvature of a circle into manageable block patterns. Here’s a step-by-step guide on how to use it:
a.Understanding the Chart:
- The chart usually depicts a quarter (or one-fourth) of a circle, taking advantage of the circle’s symmetrical nature.
- Each row in the chart indicates the number of contiguous blocks needed to emulate the curve for that segment of the circle.
b.Selecting Circle Size:
- Charts often come with multiple patterns for different circle diameters. Determine the size of the circle you want to create and find the corresponding pattern on the chart.
c.Laying the Foundation:
- Start in an open space, ensuring you have enough room.
- Use the chart to lay out the first quadrant. For instance, if the pattern begins with “4 blocks”, place them in a straight line. Follow the subsequent lines in the chart, placing the appropriate number of blocks.
d.Mirroring the Quadrants:
- Once the first quadrant is complete, mirror that pattern to form the other three quadrants of the circle.
- Ensure consistency and symmetry by constantly referring to your initial quadrant.
- Fine-Tuning:
- After completing the circle, step back to observe its overall shape. Make any necessary adjustments to enhance its round appearance.
How To Build A Circle From Scratch
The beauty of the Chart is that it breaks down the complex curvature of circles into easy-to-follow block placements. While a circle chart provides a pre-defined guide, building a circle from scratch can be rewarding, allowing for a more personal touch. Here’s how you can do it:
a.Determine the Diameter:
- Decide on the size of your circle. Place two blocks at your desired distance apart to serve as a reference for the circle’s diameter.
b.Drawing the Axes:
- Draw a line connecting your two reference points. This serves as the diameter.
- Find the midpoint of this line, and draw a perpendicular line of the same length, forming a cross. These are your circle’s axes and will help guide your building.
c.Sketching the Circle:
- Start building your circle segment by segment, using the axes as a guide. Remember, the further away from the axes, the flatter (or more extended) the circle segment should appear.
- Often, a sequence of “long line – short line – long line” is a good starting pattern for larger circles.
d.Refinement:
- Stand back periodically and observe the circle’s shape. Since this method is more freehand, you’ll need to rely on your perception and adjust accordingly.
- Look for areas that jut out or appear too flat and modify them to make the circle smoother.
e.Completing the Circle:
- As you approach the completion of your circle, ensure the ends meet seamlessly.
- Further refinement may be needed to ensure the circle looks symmetrical and round.
How To Make A Circle With Command Blocks in Minecraft
Command blocks in Minecraft offer a variety of powerful functions, allowing players to automate processes, change game mechanics, and even create intricate structures. While building a circle manually or using a circle chart involves placing blocks one by one, command blocks can be used to generate a circle instantly. In this guide, we’ll dive into the details of creating a circle using command blocks.
1. Understanding Command Blocks
Before we jump into creating circles, it’s essential to have a basic grasp of command blocks:
- Acquisition: Command blocks can’t be obtained in Survival mode. In Creative mode, you can get them by using the command
/give @p command_block. - Activation: Command blocks are activated using redstone. Once powered, they execute their assigned command.
2. The Basics of Circle Generation
Generating a circle involves creating a loop that places blocks in a circle pattern around a center point. The concept relies on trigonometry, especially the use of sine and cosine functions. Don’t be intimidated, though – the commands handle all the math for you!
Creating a Circle with Command Blocks
Here’s a basic method to create a circle:
a.Setup Command Blocks:
- Start by placing a command block. This will be your main command block.
- Ensure you have adequate space around it, as the circle will be generated with this block as the center.
b.Command for Circle Generation:
- In the command block’s interface, input the following command:
/execute @p ~ ~ ~ fill ~ ~ ~ ~sin(360) ~ ~cos(360) minecraft:stone
- This command uses the fill command to create a stone block at a location determined by the sine and cosine functions, which will change as the circle is generated.
c.Automating the Process:
- For a full circle, you’d need to execute the command for every degree from 0 to 359 (360 degrees total). This is where loops or additional commands come into play. Depending on your comfort level with command blocks, you might create a redstone loop to activate the command block 360 times, adjusting the angles each time.
d.Adjusting Circle Size:
- To adjust the circle’s radius, multiply the sin and cos functions by your desired radius. For instance, for a circle with a radius of 5 blocks, the command would be:
/execute @p ~ ~ ~ fill ~ ~ ~ ~5*sin(360) ~ ~5*cos(360) minecraft:stone
e.Choosing Materials:
- In the provided command, minecraft:stone determines the block type. You can replace “stone” with any other block ID to change the circle’s material.
4. Advanced Circle Generation
For those who are comfortable with command blocks and want to make more advanced circles or other shapes, they might consider looking into function files, which allow for more complex sequences of commands. Using function files, you can create entire structures or patterns with a single command.
The Minecraft Circle Chart is a vital tool for serious builders in the game. By transforming the rigid, blocky world of Minecraft into one where circles and curves are possible, these charts provide players with the ability to create intricate, varied, and appealing structures. With the guidance of the chart, you’re one step closer to mastering the art of building in Minecraft.